UniConverter Guía de Usuario
-
Inicio - Mac
-
Video Convertidor - Mac
-
Audio Convertidor - Mac
-
Video Compresor - Mac
-
Descargador - Mac
-
Grabador de Pantalla - Mac
- Grabadora de Audio - Mac
- Grabar Cámara Web - Mac
- Grabador de Pantalla - Mac
-
Fusionador - Mac
-
Grabador de DVD - Mac
-
Reproducir Video - Mac
-
Editor de Video - Mac
-
Caja de Herramientas - Mac
- Convertidor de Imagen - Mac
- Creador de GIF - Mac
- Reparar Metadatos - Mac
- Extractor de CD - Mac
- Grabador de CD - Mac
- Convertidor de VR - Mac
- Recorte Inteligente - Mac
- Editor de Subtítulos - Mac
- Editor de Marca de Agua - Mac
- Removedor de Fondos - Mac
- Auto Reframe - Mac
- Retrato de AI - Mac
- Intro & Outro - Mac
- Reproductor de Videos - Mac
- Cortador de MP3 | Wondershare UniConverter para Mac
- Removedor de ruido | Wondershare UniConverter para Mac
- Removedor de voces | Wondershare UniConverter para Mac
- Estabilización de video | Wondershare UniConverter para Mac
Preguntas Frecuentes
Video/Audio Soluciones
Cómo grabar audio en Mac
La versión para Mac de Wondershare UniConverter también es capaz de grabar audio para que puedas agregarlo a tus videos mientras das voces en off. Este enfoque también es útil cuando estás en el proceso de convertirte en un artista de voz en off y necesitas practicar mucho antes de poder comenzar a actuar en proyectos reales. Cualquiera que sea su razón, así es como puede usar Wondershare UniConverter para grabar audio en Mac:
Paso 1 Seleccione la ubicación predeterminada para guardar.
Inicie Wondershare UniConverter en su computadora Mac, vaya a la categoría Grabador de pantalla del panel izquierdo y use el botón Ubicación de Archivo que se encuentra en el campo que está en la parte inferior para establecer una carpeta de salida predeterminada para los archivos grabados.

Paso 2 Inicie la grabadora de audio.
Haga clic en el botón desplegable que se encuentra junto al icono de Cámara en la esquina superior izquierda del panel central y haga clic en Grabador de Audio en el menú que aparece.

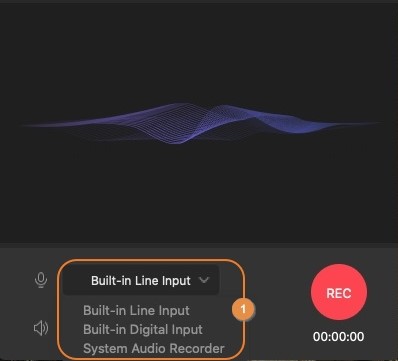
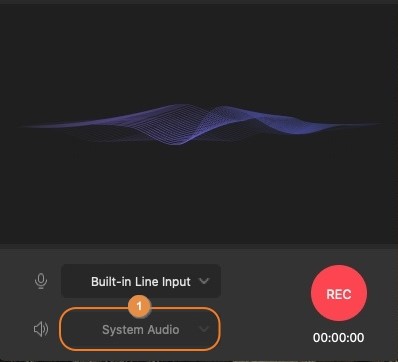
Paso 3 Seleccione el dispositivo de entrada.
Elija el dispositivo de grabación de voz y su sistema preferido entre el Micrófono y Audio (Altavoz) de las listas desplegables respectivamente.
Paso 4 Iniciar y detener la grabación de audio.
Haga clic en el botón REC para comenzar a grabar el audio y luego haga clic en Stop para detener cuando esté lista la grabación. Puede acceder al archivo grabado desde la lista en la ventana Grabador de Pantalla, o dirigiéndose a la carpeta predeterminada para guardar que seleccionó previamente en el Paso 1.


Más Informaciones Útiles
Tu caja de herramientas de video completa
